Token2Shell fully supports public key user authentication for SSH connections. You can also enable SSH Agent Forwarding and enjoy secure password-less logins on chained SSH connections. The following describes basic steps to use those features in Token2Shell.
1. Prepare a Private Key
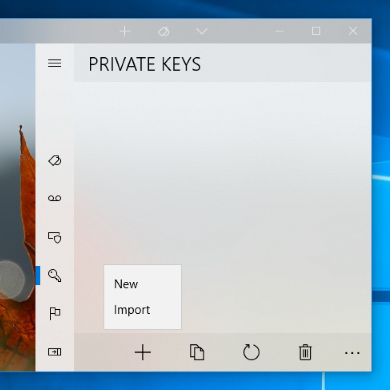
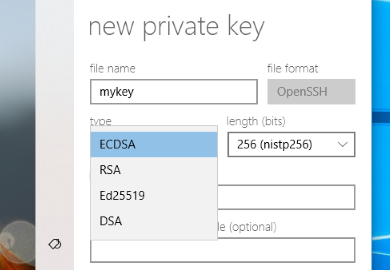
Generating new private keys
Importing private keys
Token2Shell internally uses the same private and public key file format as OpenSSH. Hence if you already have such keys, Token2Shell simply copies and uses them as is. Token2Shell also supports private keys in PuTTY (*.ppk) format.
- Private and public key pairs in OpenSSH file format
- A public key file must have the ".pub" file name extension and the name itself must be the same as its paired private key. For example, if your private key is named "mykey.pem", its paired public key must be named "mykey.pem.pub".
- If you select both the private and public key files, Token2Shell simply copies them to its Home folder even if your private key is encrypted.
- If you only select private keys, Token2Shell automatically creates their paired public key files while importing. If your private key is encrypted, Token2Shell will prompt you for its password as the private key needs to be decrypted in order to extract its public key.
- PuTTY (*.ppk) private keys
- If you select PuTTY private keys (*.ppk), Token2Shell automatically converts them to OpenSSH format and creates private and public key pairs. If a private key is encrypted, Token2Shell will prompt you for its password.
PIV smart cards
Token2Shell natively supports PIV smart cards. If you want to use the private keys stored on a PIV smart card, you simply need to select one from the private keys combo-box; "<piv-card> PIV Authentication (9A)" or "<piv-card> Card Authentication (9E/PINLESS)", when creating an address book entry.
If you select "<try-all>" as a private key, Token2Shell will try to access a PIV smart card only when it's already plugged in. If you explicitly select one of the "<piv-card>" private keys, Token2Shell will prompt you to insert a card if no PIV smart card is detected.
2. Create an Address Book Entry
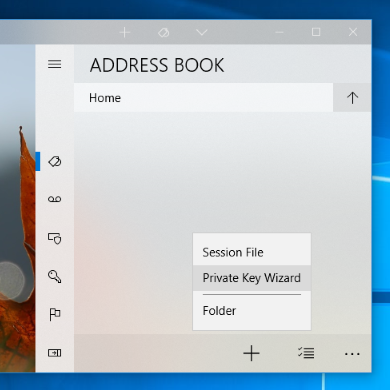
The simplest way to create an address book entry with the SSH "publickey" user authentication is using the Private Key Wizard.
STEP 2.1 Open [ Address Book ] » [ + ] » "Private Key Wizard"
STEP 2.2 Enter your server address and user ID
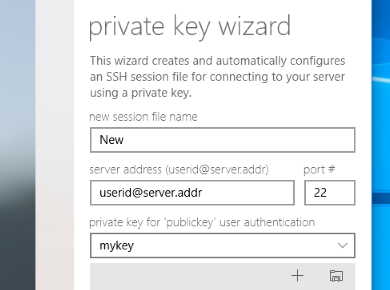
STEP 2.3 Select a private key that will be used for the authentication
If your private key is already imported and available in [ Private Keys ] panel, you can select it from the private key combo-box. If you need to import a new private key, you can just drag-and-drop it from Windows File Explorer.
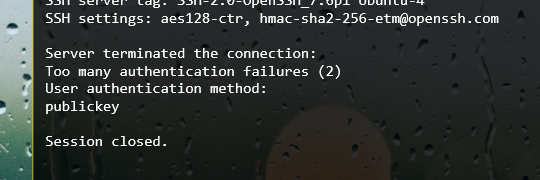
You can also select "<try-all>" and let Token2Shell try all the available private keys. However, SSH servers have a limited number of allowed authentication failures. Hence if you have many private keys, you may end up receiving a "too many authentication failures" error message and unable to connect to your server. In such case, make sure your private key for the server is on the top of the list shown in [ Private Keys ] panel by adjusting its file name.
STEP 2.4 Tap 'Create'
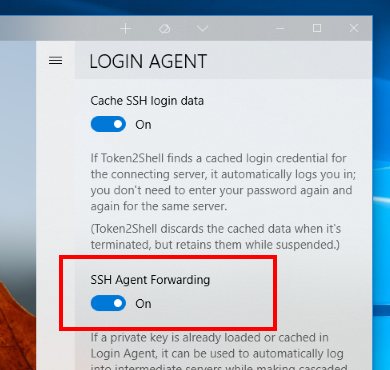
Please note that if you want to enable the SSH Agent Forwarding, you need to change the setting in Login Agent. SSH Agent Forwarding in Token2Shell is a global feature that affects all sessions.
3. Update "~/.ssh/authorized_keys" file on your server
In order for the "publickey" user authentication to work, after selecting a private key for your address book entry, you must also add its paired public key to your server account. The adding procedure varies depending on your server. However, if your server is OpenSSH, you can just paste the public key text that was copied to clipboard from Token2Shell to "~/.ssh/authorized_keys" file on your server.
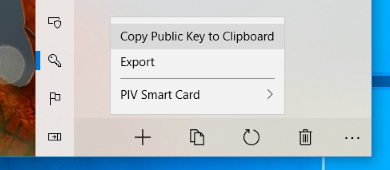
Public keys can easily be copied to clipboard in Token2Shell. You simply need to select private keys in [ Private Keys ] panel and select its [ Copy ] » "Copy Public Key to Clipboard" menu.
Please note that the access permission for the "~/.ssh/authorized_keys" file must be "-rw-------"; you must be the only one who can read and write the file. If the permission is not set correctly, the OpenSSH server will ignore the file. To set the permission, you can use the following command:
chmod 600 ~/.ssh/authorized_keys
If you also need to create a "~/.ssh" folder, its permission must also be set correctly:
chmod 700 ~/.ssh